Boston's Best Holiday Craft Ideas From A Local Artist
Holiday crafts are a major part of Christmas for many people in the Boston area, and this city knows how to put a personal touch on holiday decorating. If you need fresh ideas, lend that personal touch to your home or holiday celebrations with these great ideas from local artists. Brian Murphy and Katie Stanton have agreed to share some great ideas for making holiday crafts. Forget about gluing cotton balls on pieces of fabric or painting plastic ornaments. These ideas are not only more creative, but they last longer than a single season.
Totally Wired Sculpture
450 Harrison Ave. Suite 417
Boston, MA 02118
(617) 451-7474
www.totallywiredsculpture.com
Children's Block Sculpture
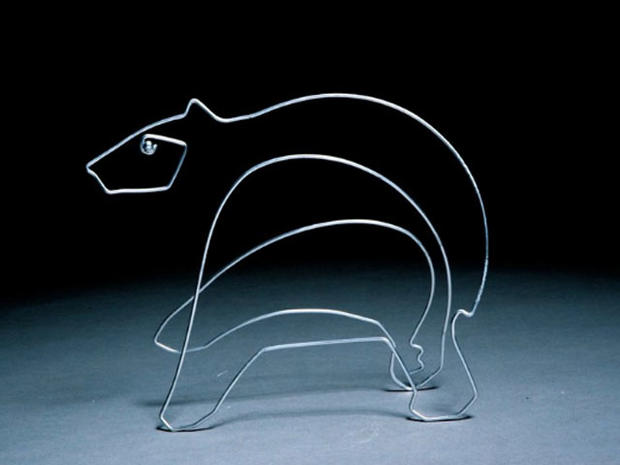
Brian Murphy can take something as simple as a children's building block and turn it into something special. He suggests crafters take this same idea and make quaint gifts out of them. Use an old building block as a stand for a whimsical wire sculpture.
1. Find an old children's block, preferably wooden.
2. Purchase black wire, which you can get at an art store or even in a hardware store.
3. Draw a picture of an object whose first letter starts with the letter on your chosen block, and sculpt the picture with the wire.
4. Drill a small hole in the block and put the end of the wire into the block.
5. You can paint the wire or leave it as is.
Wire Christmas Ornaments
Murphy suggests using a four-inch metal ring and some wire to create a Christmas tree ornament. In just a few steps, crafters may create durable, stylish and safe ornaments for their trees or wreaths.
1. Find a four- to five-inch brass or steel ring at a craft store.
2. Murphy uses copper but you can use whatever type of wire you want. Cut off 20 inches worth of it.
3. Draw a picture of the image you want in the ring. Murphy chose a Christmas tree. To decorate the tree, he used six small beads and a small necklace that was broken.
4. Murphy again lays the wire on the picture and, with a pair of small pliers, replicates the tree to match his picture.
5. He glued the six beads and the string of beads on the tree.
6. Lastly, wrap the end of the wires around the ring and make a swirl and wrap that around the top of the ring to hang the ornament from a branch or in a window.
Wire Flowers
Murphy gives another way for designing gift sculptures that can work for recipients of all ages. Take an acrylic or wooden base and sculpt a wire flower with aluminum wire. He suggests enamel paint for the wire.
1. Start out with a block. It can be a wooden block or acrylic.
2. Wire may be aluminum or steel, about 24 inches long.
3. Draw a picture of a flower. It can be basic or fantastic.
4. With a small pair of needlenose pliers, lay your wire along the lines of your picture
5. Drill a small hole in block and put the end of the wire in the hole with a bit of super glue
6. This one can be painted to make it pop.
Brian Murphy is a long-time child therapist who began using art therapy as a means to help his patients in 2001. In the process of helping these traumatized children regain their self-confidence and confront their fears, he found his passion and skill for wire sculpture.
Related: Top Arts & Crafts Classes And Activities For Kids In Boston
Katie Stanton
WarmShade's Widgets
(774) 444-8104
www.etsy.com/shop/warmshadeswidgets
Candy Cane Glass Art
1. Purchase one glass vessel of optional size and shape. The best shapes are not cylindrical or have a narrower area, so there is something for the ribbon to rest on. Wash and thoroughly dry the glass.
2 Gather a length of red ribbon for Christmas or blue for Hanukkah. The ribbon should be the length of the vessel around plus six to eight inches, depending on the desired bow size.
3. Find two bells appropriate for the ribbon and vessel size, red bake-to-set enamel paint (blue for Hanukkah), white bake-to-set enamel paint, a glue gun and small detail paintbrush. Pro tip from Stanton for crafting newbies: Don't stress about the painting too much, if you mess up let the paint dry, then scratch the mistake right off.
4. Take the already cleaned, dried vessel and the starter color and paint brush. Pick a point to start at on the glass where there is a bend or line, and work from the middle up, then the middle down. This keeps the lines neater as the space is more easily controlled when broken up into smaller areas. Using the starter color, make lines that go from the middle to the top. Space them as evenly as possible, leaving gaps for your secondary color. Make sure the lines are angled so it looks like a spiral/candy cane. Now, flip the vessel and use the starter color to work in the pattern the same way. Allow the first coat to dry, and repeat the steps for the second paint color. The final pattern should have the lines alternating in color.
5. Once the second color is dry, it is time to bake the vessel to set the color; follow the manufacturer's instructions on the paint for best results. Once the vessel is baked and cooled, tie the ribbon to form a bow around the narrowest part of the vessel. Attach a bell to each end of the ribbon with the glue gun, and the project is complete.
Message in an Elf Bottle (For letters to Santa or present lists)
1. Gather a small bottle with a cork (two inches or smaller works best as elves are small), fine grain glitter in three shades — green, red and silver for Christmas or blue, white and silver for Hanukkah — paper cut to fit rolled inside the bottle, six inches of red (blue or silver) 1/4-inch ribbon and two small bells.
2. Remove the cork of the bottle. Add about 1/4 inch of glitter to the bottle, but feel free to use more or less for this step.
3. Take the paper and roll it tightly. Hold the rolled paper for a minute so it stays coiled when released. For a cute detail accent, take an extra step and wrap a small amount of thread around the "letter" and tie it off. Put the coiled paper into the bottle, and replace the cork.
4. Take the ribbon and tie it around the neck of the bottle. Tie the bells on to each end of the ribbon. This can be given as a trinket, or attach a hook and use it as an ornament.
Katie Marie Stanton is a crafts designer from Plymouth County. This recently married professional creates fun crafts using a variety of materials. Whether it is jewelry, glassware, small sculptures or even nail art, she creates fun pieces with splashes of color or subdued pieces that rely on shape and movement to catch the eye.
Related: Best Places for Glass Art in Boston
Shelly Barclay is a professional freelance writer and amateur author. She writes on a variety of topics from food to mysteries. She loves to share the culture and rich history of her birthplace and home, Boston, with the rest of the world. Her work can be found at Examiner.com.